
Above: Caktus uses several mobile devices for accessibility testing. For a more realistic experience, it’s important to test on devices, and not just with simulators.
When Caktus first started the discussion of accessibility testing, this was me:

If you’re new to testing accessibility features like I was, it can feel like an amorphous blob that you’ve been tasked with putting into organized boxes. There are multiple finite and specific standards that your website or app must adhere to in order to be considered accessible. As a QA (quality assurance) tester, you’ll find that a variety of tools and resources are needed to verify that accessibility standards are met. When you first begin your project, testing accessibility features can feel overwhelming. To help, I compiled a list of things I wish I would have known when I first started:
Different Standards Qualify a Website as Accessible
I’m going to simplify these standards greatly, so I highly recommend navigating to the following sites and becoming familiar with the terminology, mission, and standards:
The World Wide Web Consortium (W3C). This organization develops and sets certain web standards, on a broader level than just accessibility.
A subset of W3C is the Web Accessibility Initiative (WAI), which specifically sets the standards for what deems a website, app, or piece of software accessible to people with disabilities. At this level, there are subcategories of guidelines and many more acronyms. The following two guidelines have the primary objective of making your product functional for the end-user:
Diving down just one more level, you can decide how compliant you want to be by choosing a conformance level. They are A, AA, and AAA, with AAA being rated highest. When beginning your project, it’s imperative to determine which of the above compliance levels you want to adhere to, as this will determine the amount of development work needed.
Specific Software is Needed to Test Features
 For screen readers, there are quite a few options but I stick with the native mobile tools. For iOS, the native tool is VoiceOver and Android devices use TalkBack (pictured). For PC, I was directed to NVDA, which I am particularly pleased with. To best use these tools, I cannot stress enough how watching videos or navigating through the tutorial will help you out. I’m a throw-out-the-instructions and don’t-tell-me-how-to-live kind of person, so I had to swallow my pride and follow the tutorial and holy cannoli, I’m happy I did. From double-tapping to particular gestures, there are many nuances involved, and generally navigating a website while using screen reader technology takes longer, even when you’ve learned to navigate correctly.
Another accessibility item that frequently came up in our usability testing results is adjusting the color contrast for text. This is essentially adjusting both your background and font color to make it easier to read (i.e., blue text on a light blue background would not pass).
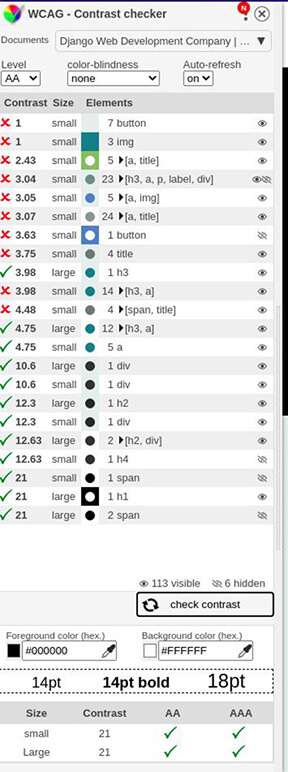 For Chrome and Firefox, I like the WCAG Color Contrast Checker extension (pictured). For iOS, I found an app called Color Contrast, which allows you to select points on an uploaded picture to assess accessibility compliance.
You’ll Need an External Keyboard
Get an external keyboard for testing on mobile devices. When the Acceptance Criteria for our project referenced keyboard compatibility, it took me way longer than I’d like to admit to discern that a Bluetooth or wireless keyboard was needed. Have you ever looked for a tab button on SwiftKey? I have. It’s not there. The keyboard I use is a Logitech K480, but any keyboard will work since you’ll primarily use Tab, arrow keys, and Enter. As with the keyboard, a physical mobile device may also be necessary for testing, even though there are many great emulation tools available. For example, I had a difficult time configuring audio output and keyboard compatibility and ultimately switched completely to an array of physical devices to test these features. Sorry, Sauce Labs!
Add Padding when Estimating Stories
The Scrum Master in me would be remiss if I didn’t mention estimating stories, so when you’re part of an Agile team that’s delivering accessible features for the first time, don’t be scared to be generous when sizing your stories. I found that I spent a considerable chunk of time doing research, sourcing and configuring tools, and just getting everything working as it should. Then it came time to test. I found that by the end of our Sprints, I had burned through more hours than I had intended to, so make sure you include your prep time in addition to your test time.
It’s Worth It
There you are! All in all, don’t be scared when you start your first accessibility project. It is fairly difficult, and sure, it can be frustrating but spend time doing the research before development begins. And always remember as QA, you are the advocate and voice for the end-user, and making a product that is more accessible to a broader group of people is pretty cool. I felt proud by the end of our project, and that’s worth all the pain.