
Last year, Apple announced that they would transition their entire Mac line from Intel processors to their ARM64 Apple Silicon chip called the M1. Several weeks ago, I started testing development on MacBook Air with the Apple M1 chip (pictured above).
Is development possible on the M1? Yes. Is it easy and straightforward? Not always, but if you can live with a few workarounds, you can make it work. While many software packages now natively support Apple Silicon (see Does it ARM?), the development space is still in the process of rolling out support, like Docker.
This post will likely age quite quickly! Many software packages have received Apple Silicon-related updates over the past few weeks.
My Development Environment
At a high level, I'm currently running the following on the M1:
- Python and Django (Homebrew and Xcode)
- JavaScript and React (Homebrew and nvm)
- PostgreSQL (Homebrew)
- Docker (Apple M1 Tech Preview)
- Visual Studio Code (Insiders)
Other packages are used to help achieve this development environment, from iTerm2 to direnv, so M1 support looks good here. The areas I'm still having issues with or haven't had time to dig into yet are:
- Python 3.7 under Rosetta 2
- Building and running certain Docker images locally
- Java
The info below covers steps (and gotchas) to configure a development environment like this.
Rosetta 2 and Command Line Tools for Xcode
First, make sure Rosetta 2 is installed. Rosetta 2 enables a Mac with Apple silicon to use apps built for a Mac with an Intel processor. Install it with:
softwareupdate --install-rosetta --agree-to-license
Also, install Xcode's command-line tools for python3 and other useful
libraries:
xcode-select --install
Activity Monitor includes a handy Architecture column indicating which processes are running on Apple vs. Intel (Rosetta 2) architecture. Here's a screenshot showing Python 3.7 running under Rosetta 2:
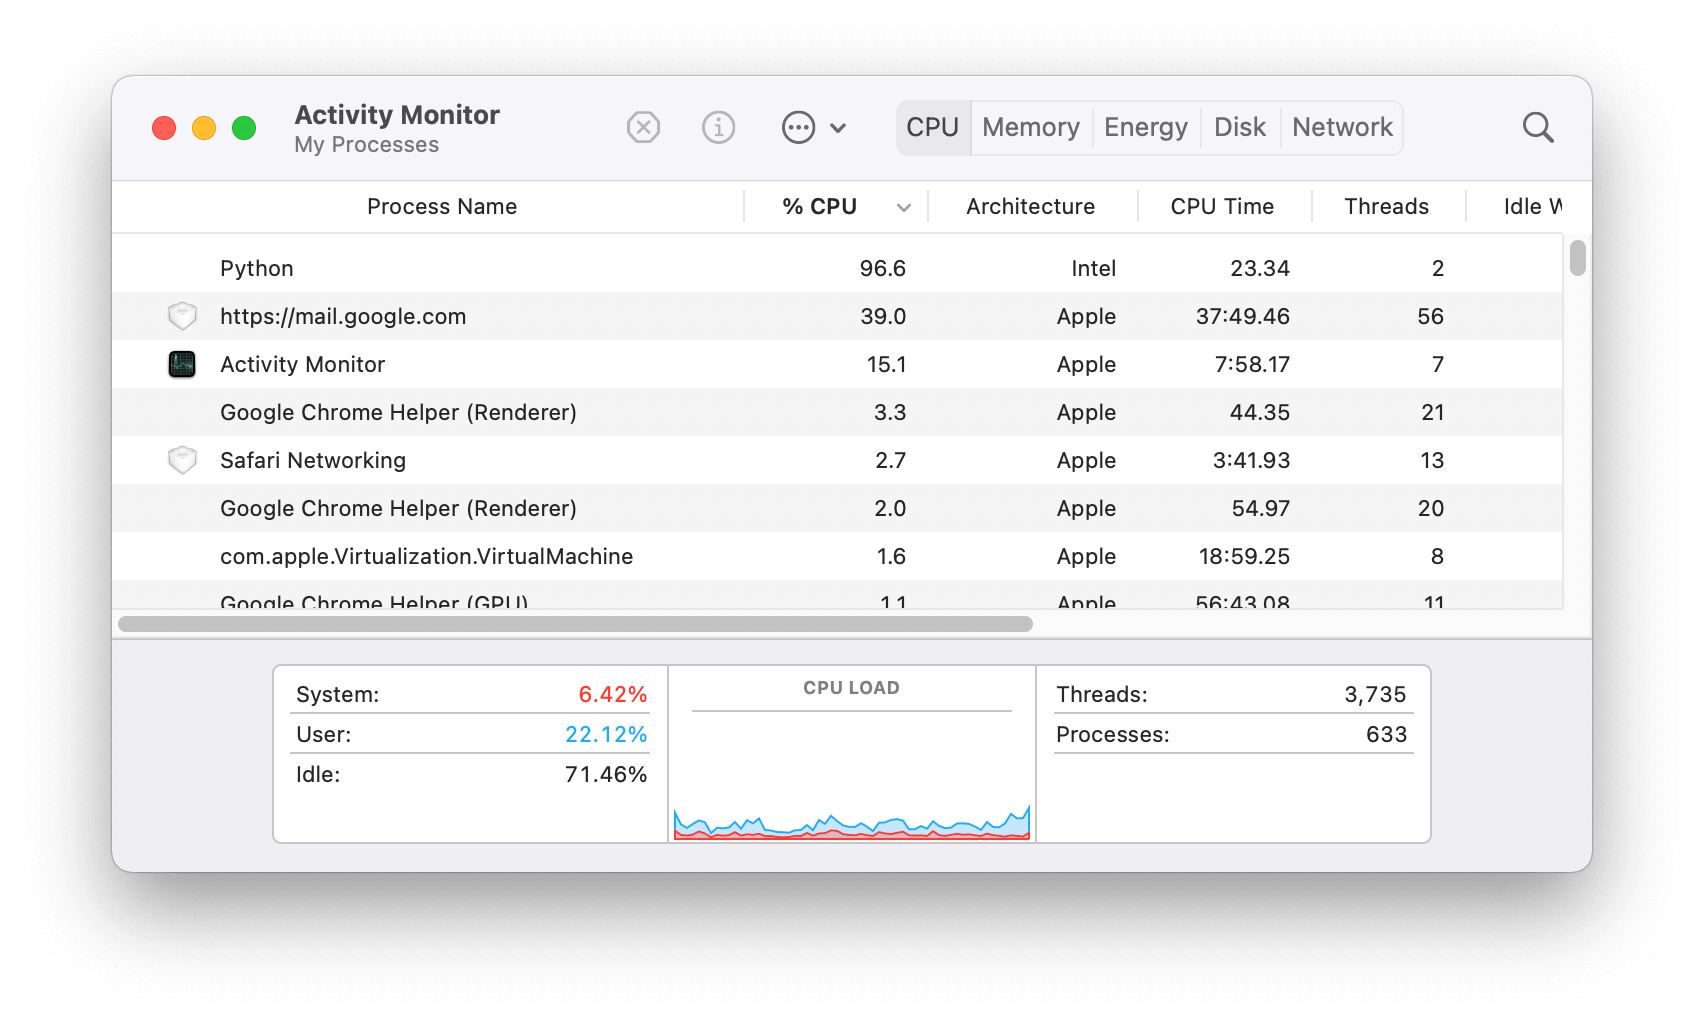 {width=“100.0%”}
Intel-emulated Terminal
With Rosetta 2 installed, you can use the arch command to run commands
under Rosetta 2:
> arch
arm64
> arch -x86_64 bash -c "arch"
i386
My current .zshrc configuration is incompatible using Rosetta 2, so
you may not be able to launch a zsh shell like this:
❯ arch -x86_64 zsh
arch: posix_spawnp: zsh: Bad CPU type in executable
So I use bash as noted in the first example, to install packages under
Rosetta 2.
Install Homebrew
Homebrew does support Apple Silicon. However, a particular package may not run natively, so your mileage may vary. To support running both native arm64 and x86-emulated homebrew packages, you install them side-by-side.
Install arm64 brew into /opt/homebrew using the Alternative Installs
method:
mkdir homebrew && curl -L https://github.com/Homebrew/brew/tarball/master | tar xz --strip 1 -C homebrew
sudo mv homebrew /opt/homebrew
export PATH="/opt/homebrew/bin:$PATH"
brew update
Install Intel-emulated Homebrew
Install Intel-emulated Homebrew to the default /usr/local:
arch --x86_64 /bin/bash -c "$(curl -fsSL https://raw.githubusercontent.com/Homebrew/install/master/install.sh)"
Apple Silicon Workaround - nvm
nvm is available in Homebrew:
brew install nvm
I was able to install the latest version of node using nvm:
❯ nvm install v15
It builds from source and takes a while, but eventually produces an arm64 executable:
❯ file `which node`
/Users/colincopeland/.nvm/versions/node/v15.5.0/bin/node: Mach-O 64-bit executable arm64
❯ node -p process.arch
arm64
However, as noted in nvm install node fails to install on macOS Big Sur M1 Chip #2350, older versions of node require Rosetta 2.
You can install Node v12 like this:
❯ arch -x86_64 bash
❯ source /opt/homebrew/opt/nvm/nvm.sh
❯ nvm install v12
Downloading and installing node v12.20.0...
Downloading https://nodejs.org/dist/v12.20.0/node-v12.20.0-darwin-x64.tar.xz...
Computing checksum with shasum -a 256
Checksums matched!
Now using node v12.20.0 (npm v6.14.8)
Now you can switch seamlessly:
❯ nvm use 12
Now using node v12.20.0 (npm v6.14.8)
❯ node -p process.arch
x64
❯ nvm use default
Now using node v15.5.0 (npm v7.3.0)
❯ node -p process.arch
arm64
Python
Python 3.8 and Python 3.9 install easily using homebrew:
❯ brew install [email protected] [email protected]
❯ file /opt/homebrew/bin/python3.9
/opt/homebrew/bin/python3.9: Mach-O 64-bit executable arm64
However, Issue 41100 indicates Python 3.7 and below will never be supported on Apple Silicon:
There are no plans to backport support to 3.7 and 3.6 which are in the security-fix-only phase of their release cycles.
Rosetta 2 is required for these versions. Additionally, not all Python libraries and packages run on Apple Silicon, so it's useful to install the Intel-emulated versions as well:
❯ arch -x86_64 bash
$ export PATH="/usr/local/Homebrew/bin:/usr/local/bin:/usr/bin:/bin:/usr/sbin:/sbin"
$ brew install [email protected] [email protected]
$ file /usr/local/opt/[email protected]/bin/python3.7
/usr/local/opt/[email protected]/bin/python3.7: Mach-O 64-bit executable x86_64
Xcode's command-line tools provide several versions of Python that can run natively on Apple Silicon. So with Xcode's help, I'm currently running the following versions of Python using Homebrew and Xcode:
arm64:
- Python 2.7.16 (Xcode)
- Python 3.8.7 (homebrew)
- Python 3.9.1 (homebrew)
Intel-emulated (with Rosetta 2):
- Python 3.7.9 (homebrew)
- Python 3.8.7 (homebrew)
Python with direnv
I used to use pyenv and
pyenv-virtualenv, but I
wasn't able to install different versions successfully (even in
Rosetta). I've now switched to direnv's
layout_python to replace
pyenv-virtualenv's management of project virtual environments, which
so far has been great.
It's easy to auto-create and activate an arm64 Python 3.9-based virtual environment with:
## project-a/.envrc
layout python /opt/homebrew/bin/python3.9
And just as easy with an Intel-emulated Python 3.7:
## project-b/.envrc
layout python /usr/local/opt/[email protected]/bin/python3
Python packages requiring compilation
I found it useful to export these flags to ensure Python packages compile properly:
## useful Python C-library compliation flags
export LDFLAGS="-L$(brew --prefix openssl)/lib -L$(brew --prefix zlib)/lib"
export CPPFLAGS="-I$(brew --prefix openssl)/include -I$(brew --prefix zlib)/include"
Python Intel-emulated workarounds
Some packages fail to install on Apple Silicon:
❯ file `which python`
/Users/copelco/projects/.../.direnv/python-3.9.1/bin/python: Mach-O 64-bit executable arm64
❯ pip install numpy
*** snip ****
  ----------------------------------------
  ERROR: Failed building wheel for numpy
But can be installed using an Intel-emulated version:
❯ file `which python`
/Users/copelco/projects/.../.direnv/python-3.8.7/bin/python: Mach-O 64-bit executable x86_64
❯ pip install numpy
Issues with Intel-emulated Python 3.7
I've had the most issues with Python 3.7. Python 3.7 isn't supported on Apple Silicon. It can be installed via Homebrew using Rosetta 2, but I've had trouble using it with my Django projects.
For example, I've run into issues with packages with external
dependencies (such as libffi):
❯ file `which python`
/Users/copelco/projects/.../.direnv/python-3.7.9/bin/python: Mach-O 64-bit executable x86_64
❯ pip install bcrypt
❯ python3 -m bcrypt
Traceback (most recent call last):
  File "/usr/local/Cellar/[email protected]/3.7.9_2/Frameworks/Python.framework/Versions/3.7/lib/python3.7/runpy.py", line 183, in _run_module_as_main
    mod_name, mod_spec, code = _get_module_details(mod_name, _Error)
  File "/usr/local/Cellar/[email protected]/3.7.9_2/Frameworks/Python.framework/Versions/3.7/lib/python3.7/runpy.py", line 142, in _get_module_details
    return _get_module_details(pkg_main_name, error)
  File "/usr/local/Cellar/[email protected]/3.7.9_2/Frameworks/Python.framework/Versions/3.7/lib/python3.7/runpy.py", line 109, in _get_module_details
    __import__(pkg_name)
  File "/Users/copelco/projects/test/.direnv/python-3.7.9/lib/python3.7/site-packages/bcrypt/__init__.py", line 25, in <module>
    from . import _bcrypt  # type: ignore
ImportError: dlopen(/Users/copelco/projects/test/.direnv/python-3.7.9/lib/python3.7/site-packages/_cffi_backend.cpython-37m-darwin.so, 2): Symbol not found: _ffi_type_double
  Referenced from: /Users/copelco/projects/test/.direnv/python-3.7.9/lib/python3.7/site-packages/_cffi_backend.cpython-37m-darwin.so
  Expected in: flat namespace
 in /Users/copelco/projects/test/.direnv/python-3.7.9/lib/python3.7/site-packages/_cffi_backend.cpython-37m-darwin.so
Docker
Docker can be installed using the Apple M1 Tech Preview. I've run into several issues using this version.
The first issue is some images depend on binaries that don't have arm64
variants yet. For example, npm install fails to find a
sentry-cli-Linux-arm64 here:
------
 > [static_files  4/10] RUN npm install --silent:
## 17 11.55 Error: Unable to download sentry-cli binary from https://downloads.sentry-cdn.com/sentry-cli/1.61.0/sentry-cli-Linux-arm64.
## 17 11.55 Server returned 403: Forbidden.
------
executor failed running [/bin/sh -c npm install --silent]: exit code: 1
I've looked into using buildx to support multi-arch
builds, such as in
this How to Actually Deploy Docker Images Built on M1 Macs With Apple
Silicon
blog post. The problem is, in some cases, I only want to build the x86
variant.
For the time being, I'm using How to deploy on remote Docker hosts
with
docker-compose
to build x86 images with Docker
Contexts.
This method allows me to point my docker CLI to a Linux box running on
my local network to build images.
Kubernetes - kubectl CLI
kubectl on Apple Silicon is slated for Go
1.16. Following
Install kubectl binary with curl on
macOS,
I wasn't able to run the binaries using Rosetta 2. However, Docker's
[Apple M1 Tech Preview] comes with kubectl 1.19:
❯ kubectl.docker version
Client Version: version.Info{Major:"1", Minor:"19", GitVersion:"v1.19.3", GitCommit:"1e11e4a2108024935ecfcb2912226cedeafd99df", GitTreeState:"clean", BuildDate:"2020-10-14T12:50:19Z", GoVersion:"go1.15.2", Compiler:"gc", Platform:"darwin/amd64"}
However, you can also use homebrew to install an Intel-emulated version of kubectl:
arch -x86_64 bash
export PATH="/usr/local/Homebrew/bin:$PATH"
brew install kubectl
Summary
That's it! If you have additional ideas and/or workarounds, I'm excited to hear about them in the comments.